
Growing food doesn’t always require a large garden. At Vizcaya Museum and Gardens, our Urban Agriculture team uses hydroponics vertical towers as an effective way to grow leafy greens and herbs using this sustainable, space efficient practice.
On this page, you’ll find a full video tutorial showing exactly how we build our towers, paired with a written step-by-step guide you can follow at your own pace.
If you’re looking for a DIY gardening project, a vertical hydroponics system, or a space-saving way to grow food at home, this guide is designed to help you get started.
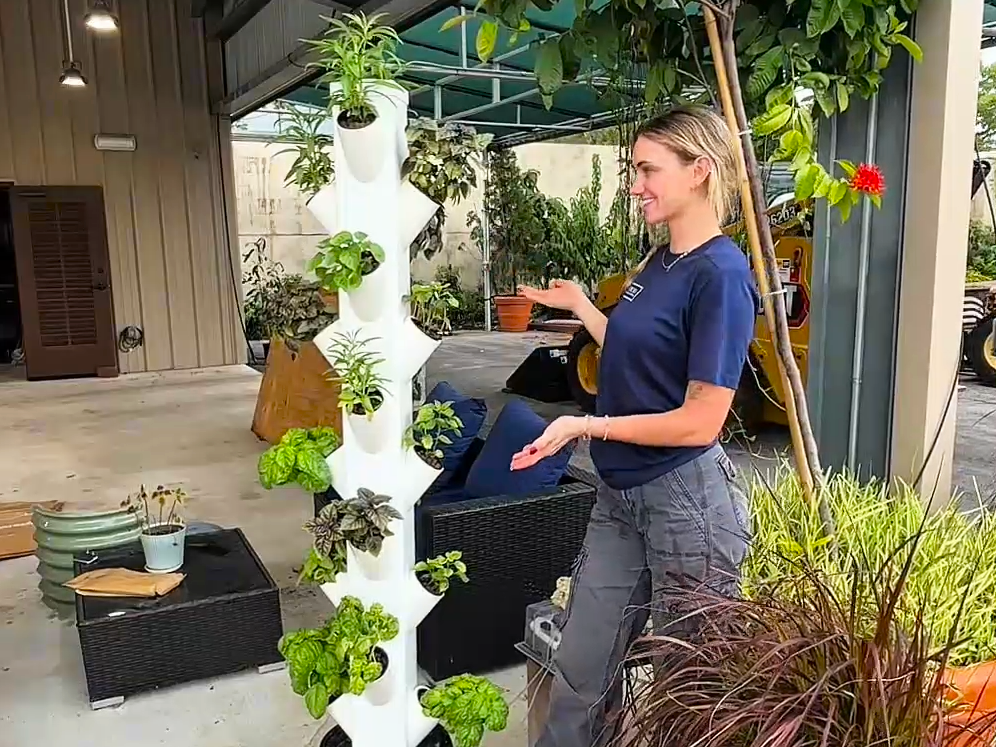
In the video above, Rosie from Vizcaya’s Urban Agriculture team walks through the complete process from preparing the pipe and planting seedlings to nutrient mixing, watering, and ongoing maintenance.
Below, you’ll find the same process broken down in writing, with additional context and tips you can reference while building your own tower.
What Is a Hydroponics Vertical Tower?
A hydroponics vertical tower is a vertical growing system that allows plants to grow upward instead of outward. Rather than spreading plants across a traditional garden bed, planting pockets are stacked vertically along a central column and grown using water with dissolved nutrients instead of soil.
This makes vertical towers ideal for:
- Small yards and patios
- Urban and suburban homes
- Balconies and courtyards
- Schools and teaching gardens
- Anyone interested in sustainable or space-efficient gardening
At Vizcaya, we primarily use these towers to grow leafy greens such as lettuce, Bok choy, or Swiss chard, along with herbs and other shallow-rooted plants.
In this video, Rosie experiments with a diverse mix of plants including celosia, purple basil, lettuce, basil, yellow peppers, and coleus to demonstrate how a vertical hydroponic tower can be both highly productive and visually appealing, showcasing its flexibility for different growing goals.

Materials You’ll Need
Most of the materials used in this project are affordable and easy to find at local hardware or garden stores.
Core Structure
- 5 in. × 5 in. × 8 ft. white vinyl fence post (main tower body)
- 2 Pyramid post top (caps the tower)
- 5-gallon food-safe white bucket (nutrient reservoir)
Internal Plumbing & Water Delivery
- 3 in. × 10 ft. PVC Schedule 40 pipe (internal support and net pot holder)
- ¾ in. × 10 ft. PVC Schedule 40 pipe (internal water line from reservoir to top of tower)
- ¾ in. slip-to-male-thread adapter (top of system connection)
- A cut plastic bottle bottom is used at the top of the system to help distribute nutrient solution evenly.
Pump, Aeration & Timing
- Pond pump (circulates nutrient solution from reservoir to top of tower)
- Silent air bubble disk stone aerator with 2 m silicone tubing
- Run aerator 24 hours before use to off-gas chlorine
- Run ~5 minutes before nutrient dispersal during operation
- Grow light timer (used to control pump cycles; short, frequent run times)
- Extension cord (as needed)
Planting Cups & Media
- 3-inch slotted mesh net pots (9GreenBox or similar)
- Alternative: 16 oz plastic cups (helps retain hydroton and improves nutrient contact)
Hydroton (clay pebbles) - Rockwool cubes (approximately 45 blocks)
Sealants, Adhesives & Tools
- Vinyl fence cement (used to attach 3-inch PVC net pot holders to tower)
- All-Purpose Silicone caulk (clear)
- Paint brush (for applying cement and sealant)
- Sandpaper (to rough PVC surfaces before cementing)
Water Quality & Monitoring
- pH control kit (target range: 5.5–6.5)
- pH Down (Florida tap water tends to be alkaline)
- EC (electrical conductivity) meter
- Optional: Epsom salt (¼ tsp per gallon if magnesium deficiency appears)
Nutrients
- General Hydroponics FloraSeries (FloraGro, FloraMicro, FloraBloom)
- Trial pack for testing however 1-gallon bottles are more economical long-term
Mix according to growth stage and EC readings.
Step-by-Step: How to Build a Hydroponics Vertical Tower
Step 1: Cut and Mark the Pipe
Begin by cutting your 4-inch PVC pipe at a 50-degree angle. This angled cut allows each planting pocket to sit flush against the main tower while positioning the net pots, so plants grow upward and creating a secure pocket for the hydroton to sit. Without the angle, the growing media would be more likely to fall out of the cup.
To create evenly spaced planting pockets:
- Use the angled opening of the PVC you just cut as a template
- Place it against the tower and trace the outline to mark each opening
- Space openings approximately 5.5–6 inches apart to allow room for plant growth
- Once marked, use a 3-inch hole saw to drill each opening.
Step 2: Stabilize the Base
Stabilizing the tower is essential to keep it upright and secure. In this build:
A cut pyramid fence post topper is attached to the bottom of the 5 gallon bucket using adhesive
This creates a stable base and helps center the tower over the reservoir
This method worked well for our setup, but other stabilization approaches may also be used depending on available materials and site conditions, such as adding gravel in the base.
Step 3: Install Planting Cups
After attaching the angled 4-inch PVC sections to the main tower using adhesive, place the net pots or planting cups inside the 4-inch PVC holders.
Make sure each cup sits securely within the angled PVC so the growing media stays in place and plants are properly supported as they establish.
Step 4: Add Plants and Growing Media
Seedlings are started separately in rockwool, as shown in the video, and moved into the tower once established, usually after around 3 weeks or when their true leaves have developed.
Place each seedling into a planting cup and surround the rockwool with hydroton (clay pebbles) to provide support and airflow around the roots. Make sure the rockwool is fully covered, as limiting light exposure helps reduce algae growth and preserve nutrients.
Step 5: Nutrients
Because hydroponics relies on water, not soil, plants receive nutrients through a liquid nutrient solution.
At Vizcaya, we mix hydroponic nutrients according to manufacturer recommendations and growth stage. This replaces traditional vegetable or starter fertilizers used in soil-based systems, such as those in the main garden. Always:
- Measure carefully
- Mix nutrients thoroughly with water
- Follow the manufacturer’s feeding recommendations for your specific nutrient brand and plant growth stage
- Avoid overfeeding, especially with young plants, as their sensitive roots can be damaged by excess salts
Step 6: Fill and Maintain the Reservoir
This tower is supplied by a 5 gallon reservoir at the base, where nutrient rich water is pumped to the top of the system and allowed to flow downward, delivering nutrients directly to the roots growing inside the tower.
Key tips:
- Fill the reservoir with water then add nutrients
- Reverse osmosis (RO) water is ideal
- If using tap water, allow it to circulate with the air stone and aerator for 24 hours to allow gas chlorine to escape, which can harm young seedlings.
Once the water is conditioned, add hydroponic nutrients according to manufacturer recommendations and mix thoroughly.
As the system runs:
- Nutrient solution is pumped from the reservoir to the top of the tower and flows downward through each planting pocket
- The reservoir typically needs to be refilled every 7 to 10 days, depending on weather, plant size, and growth rate
- Nutrient strength should be adjusted as plants mature and nutrient demand increases
- Regular check water level, pH, and Electrical conductivity (EC) to maintain optimal growing conditions.
Final Setup Tips and Ongoing Care
Before running the system long term, take a moment to check the final setup and operating conditions.
Place towers in a location with adequate light while providing some protection from extreme heat or harsh afternoon sun, especially in warmer climates, depending on your crop. Make sure the tower is level and stable before filling the reservoir completely
Confirm that all pumps, tubing, and fittings are secure and functioning properly before adding plants
Once running:
- Monitor the system during the first few cycles to ensure water is flowing evenly through all planting pockets.
- Adjust pump run times as needed to avoid oversaturation while keeping roots consistently moist. At Vizcaya, systems typically run on a 15 minutes on, 15 minutes off cycle, especially during midday heat. Longer off cycles may be used at night when transpiration rates are lower.
- Clean the reservoir, pump, and air stone periodically to prevent buildup and maintain water quality.
These final checks help ensure the tower runs smoothly and supports healthy plant growth over time.
Why Build a Vertical Hydroponics Tower?
This project is popular with home gardeners and educators because it is:
- Space-efficient
- Soil-free and clean
- Beginner-friendly
- Affordable
- Adaptable to many environments
- Well-suited for leafy greens and herbs.
Together, these qualities make vertical hydroponic towers especially useful for teaching food systems and sustainability in homes, classrooms, and community gardens.
Learn More from Vizcaya’s Urban Agriculture Team
This tutorial is part of Vizcaya Museum and Gardens’ ongoing work to share sustainable gardening practices and hands-on learning with the community.
You can work hand-in-hand with our team of expert horticulturists and learn more valuable tips and tricks when you volunteer with us. Check out the latest opportunities here.